
Explore Products
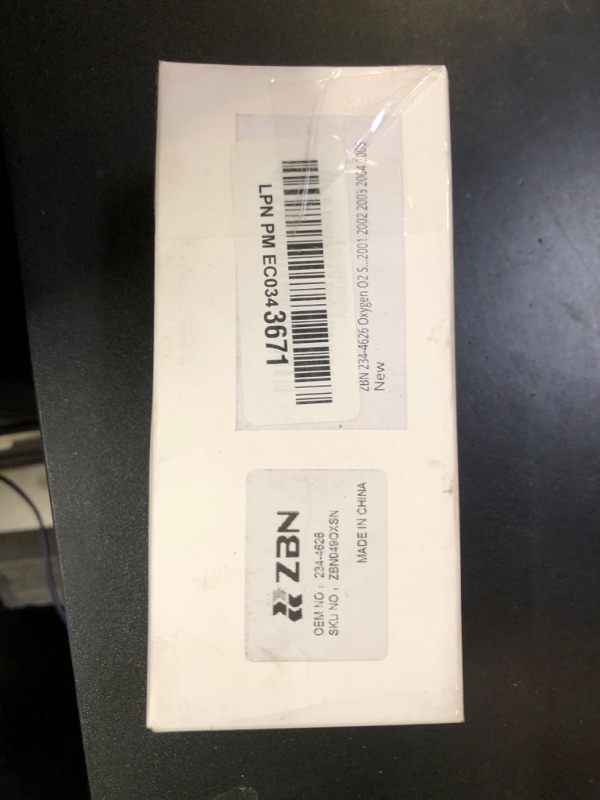
ZBN 234-4626 Oxygen O2 Sensor Fit for Upstream SC300 1994-2000,IS300 2001-2005,Toyota Camry 1997-2001,Supra 1993-1998;Downstream Lexus GS300 1998 1999 2000 2001 2002 2003 2004 2005
ZBN 234-4626 Oxygen O2 Sensor Fit for Upstream SC300 1994-2000,IS300 2001-2005,Toyota Camry 1997-2001,Supra 1993-1998;Downstream Lexus GS300 1998 1999 2000 2001 2002 2003 2004 2005

Item Details
Pickup Location
7440 Dean Martin Dr Suite 204
Las Vegas, NV, 89139
Quality
Used
Functional
No Damage
No Assembly Needed
In Package
No Missing Parts
Auction closes
July 6, 2025 at 4:49 AM
brand
ZBNEstimated Retail Price
$23.99
weight
0.26 lbsBuyers Premium
15%
Inventory Number
1038416090
Found in
Features
- Compatible Part no. :234-4626, 2344626, 234 4626
- Compatible with Lexus: GS300 3.0L 1998-2005 Downstream,Cylinder 1, 2, 3, IS300 3.0L 2001-2005 Upstream,Cylinder 1, 2, 3, SC300 3.0L 1994-1997 Upstream, SC300 3.0L 1998-2000 Upstream Front & Downstream Rear
- Compatible with Toyota: Camry 2.2L 1997-2001 Upstream; Exc. Calif.; Exc. Calif, Supra 3.0L 1993-1995 Upstream; Calif, Supra 3.0L 1996-1998 Upstream
- Guarantee: One year quality warranty, please contact us first for a quicker and easier resolution if you encounter any problems with the product during the warranty period.
- Product: Features stable performance; durable and long-lasting; tested before shipment; box packaging type; made of quality material; meets OEM standards and specifications; utilizes high-grade technology; easy to install and does not require special tools.
- Advantage: Improves fuel efficiency and power; reduces fuel consumption; prevents shaking; optimizes concentration; eliminates failure light codes; designed as direct replacements that do not necessitate calibration or programming.
- Installation Steps: 1. Utilize diagnostic codes to pinpoint the faulty sensor location and remove it using a socket; 2. Disconnect the wiring connector; 3. Lubricate the new sensor; 4. Reconnect the connector to clear the trouble codes.
Getting Started
Learn more about bidding, winning, pickup, and more on our video tutorials page.
Visit Video Tutorials