
Explore Productsended
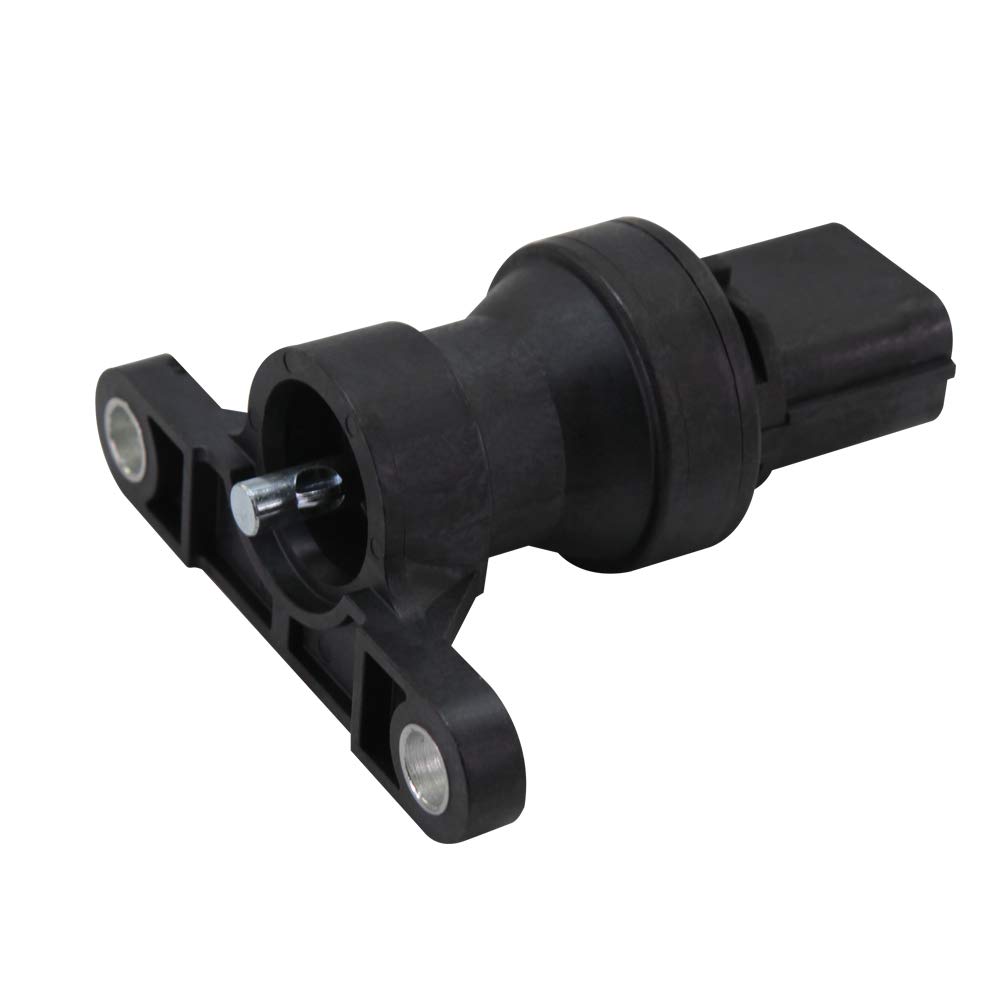
MOTISEN SS142 SC177 29523598 78410-ST7-003 Speed Sensor Compatible with Acura Integra 1994 1995 1996 1997 1998 1999 2000 2001 1.8L
MOTISEN SS142 SC177 29523598 78410-ST7-003 Speed Sensor Compatible with Acura Integra 1994 1995 1996 1997 1998 1999 2000 2001 1.8L
Description
VEHICLE FITMENT: COMPATIBLE WITH ACURA: 1994-2001 Integra GS-R Hatchback 2-Door 1.8L l4 Dohc 1994-2001 Integra GS-R Sedan 4-Door 1.8L l4 Dohc 1994-2001 Integra LS Hatchback 2-Door 1.8L l4 Dohc 1994-2001 Integra LS Sedan 4-Door 1.8L l4 Dohc 1994-2001 Integra RS Hatchback 2-Door 1.8L l4 Dohc 1994-2001 Integra RS Sedan 4-Door 1.8L l4 Dohc 1995-2001 Integra Special Edition Hatchback 2-Door 1.8L l4 Dohc 1995-2001 Integra Special Edition Sedan 4-Door 1.8L l4 Dohc
Item Details
Pickup Location
4031 Market Center Dr Suite 303
North Las Vegas, NV, 89030
Quality
New
Functional
No Damage
No Assembly Needed
In Package
No Missing Parts
brand
MOTISENEstimated Retail Price
$18.99
weight
0.13 lbsBuyers Premium
15%
Inventory Number
1041244560
Found in
Features
- Interchange Part Number:78410-ST7-003 29523598 78410ST7003 GT8040 SC177 0905-5050 5S5497 SU4192 VB001 29523598 78410ST7003
- Compatible with: ACURA Integra 1994 1995 1996 1997 1998 1999 2000 2001 1.8L
- Service: One-Year-Warranty;If you meet any problem of quality,compatibility and installation, please not hesitate to contact us. You will get a quick response and solution
- Assurance: Always provide professional, premium and high-quality, brand new vehicle sensor products. all tested and calibration during the manufacturing process for reliability, durability, and performance
- Notice: To avoid mistakes, please carefully check our product pictures,vehicle fitment and part no.to make sure they are compatible with your vehicle
- Quality: Featuring stable performance, durability, and longevity; tested before shipment; packaged in boxes; made of high-quality materials; meeting OEM standards and specifications; utilizing advanced technology; eliminates failure light codes.
- Easy Installation:easy to install without the need for special tools. Enhances performance; designed as direct replacements and no need calibration, programming, or modification.
- Installation Steps: 1. Diagnose the trouble codes to find the faulty sensor position; 2. Remove it from the connector; 3. Plug in the new sensor; 4. Clear the trouble faulty codes.

See the deals
Get in on the action, thousands of new items added daily. Bid and win!
Start bidding now